
加速 gem5 模拟
在本节中,我们将介绍如何使用快进和检查点来加速 gem5 模拟。
gem5 很慢
(不是我们的错。这是模拟的本质)

幸运的是,有一些变通方法
您不需要完美地模拟所有内容,或者根本不需要模拟

通过减少模拟内容,总是可以让模拟更快
这并不总是一件坏事…模拟的很大一部分对我们来说并不有趣
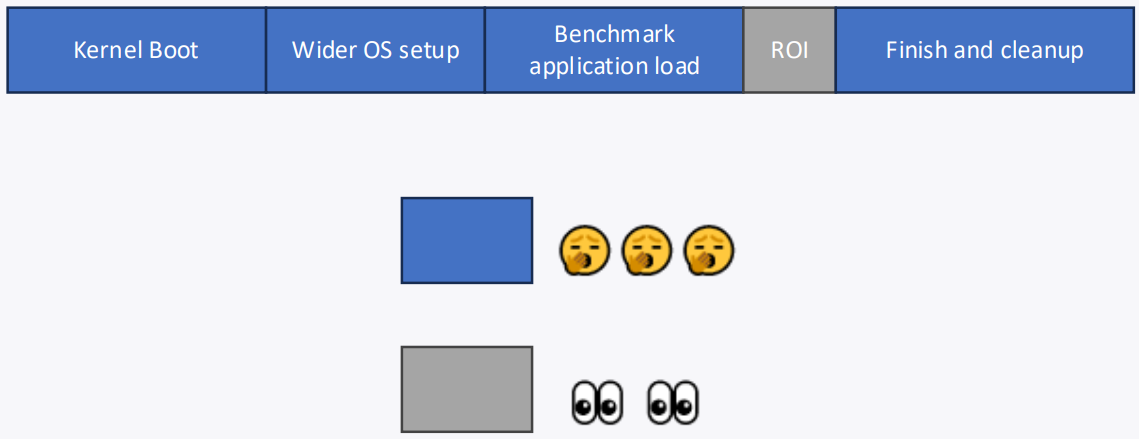
我们的目标是在详细模式下只运行感兴趣的区域
我们如何快速到达 ROI?
-
Using KVM to fast-forward
-
Taking and restoring a checkpoint
使用 KVM 快进
- KVM:基于内核的虚拟机
- 使用硬件虚拟化扩展(例如嵌套页表、vmexit 等)
- gem5 使用 KVM 作为”CPU 模型”,即代码实际上在主机 CPU 上执行
- 它很快!
使用 KVM 快进时需要注意的事项
- 客户 ISA(正在模拟的 ISA)必须与主机 ISA 匹配
- m5ops 注释必须是地址版本
地址版本的 m5ops 注释
我们在 03-running-in-gem5 中使用的指令版本的 m5ops 注释无法与 KVM 一起工作,因为主机无法识别 m5ops 指令。
如该会话所示,将出现以下错误消息:
illegal instruction (core dumped)
为了使用地址版本的 m5ops,我们需要在进程期间打开 /dev/mem 并设置一个”魔法”地址范围来触发 gem5 操作。
注意
“魔法”地址:
X86 是 0XFFFF0000
arm64 是 0x10010000
您可以通过更改 System SimObject 中的 m5ops_base 地址来配置这些”魔法”地址。源代码位于 gem5/src/sim/System.py。
可以在 gem5/src/python/gem5/components/boards/x86_board.py 下找到一个高级示例。
@overrides(AbstractSystemBoard) <- it inherits (System, AbstractBoard)
def _setup_board(self) -> None:
    ...
    self.m5ops_base = 0xFFFF0000
Hands-on Time!
01-annotate-this
材料位于 materials/02-Using-gem5/08-accelerating-simulation/01-annotate-this。
01-annotate-this.cpp 是我们在 03-running-in-gem5 中使用的相同工作负载,但这次我们需要使用地址版本的 m5ops 来注释它。
我们首先需要从 m5ops 库中获取所需的函数。
// Include the gem5 m5ops header file
#include <gem5/m5ops.h>
//
// Include the gem5 m5_mmap header file
#include <m5_mmap.h>
//
01-annotate-this
然后,我们需要根据 ISA 输入”魔法”地址。
请注意,默认的”魔法”地址是 0xFFFF0000,这是 X86 的”魔法”地址。
因此,如果我们在此示例中不执行此步骤,地址版本的 m5ops 仍然可以工作。但是,如果我们在 Arm 机器上,它将无法工作。
// Use the m5op_addr to input the "magic" address
    m5op_addr = 0XFFFF0000;
//
接下来,我们需要打开 /dev/mem/ 并为 m5ops 设置地址范围。
请注意,此步骤要求进程具有访问 /dev/mem 的权限。
// Use the map_m5_mem to map the "magic" address range to /dev/mem
    map_m5_mem();
//
01-annotate-this
就像我们在 03-running-in-gem5 中所做的那样,我们想使用 m5_work_begin 和 m5_work_end 来标记 ROI。对于地址版本的 m5ops,我们需要在原始函数名后添加 _addr。
因此,我们需要调用 m5_work_begin_addr 和 m5_work_end_addr。
// Use the gem5 m5ops to annotate the start of the ROI
    m5_work_begin_addr(0, 0);
//
    write(1, "This will be output to standard out\n", 36);
// Use the gem5 m5ops to annotate the end of the ROI
    m5_work_end_addr(0, 0);
//
最后,我们需要在所有操作完成后取消映射地址范围。
// Use unmap_m5_mem to unmap the "magic" address range
    unmap_m5_mem();
//
01-annotate-this
对于编译命令,除了
- 在工作负载的源文件中包含
gem5/m5ops.h - 将
gem5/include添加到编译器的包含搜索路径 - 将
gem5/util/m5/build/{TARGET_ISA}/out添加到链接器搜索路径 - 使用
-lm5链接libm5.a
我们还需要
- 将
gem5/util/m5/src添加到编译器的包含搜索路径 - 添加
-no-pie以不生成位置无关的可执行文件
For our Makefile, we have the following compiler command:
$(GXX) -o 01-annotate-this 01-annotate-this.cpp -no-pie \
  -I$(GEM5_PATH)/include \
  -L$(GEM5_PATH)/util/m5/build/$(ISA)/out \
  -I$(GEM5_PATH)/util/m5/src -lm5
01-annotate-this
现在,让我们尝试运行编译后的工作负载:
./01-annotate-this
我们现在应该看到这个,没有任何错误:
This will be output to standard out
List of Files & Folders:
., 01-annotate-this.cpp, .., Makefile, 01-annotate-this,
由于它在主机上运行,我们知道可以将它与 X86 KVM 一起使用。
Hands-on Time!
02-kvm-time
让我们使用 KVM 快进到 ROI
让我们运行 NPB 基准测试套件中的 Class A EP 基准测试。
gem5 资源为我们提供了 npb-ep-a 工作负载,允许我们用一行代码运行它:
board.set_workload(obtain_resource("npb-ep-a"))
因此,我们现在不需要担心构建磁盘镜像、工作负载和注释它。
在此工作负载中,EP 初始化后将有一个 m5_work_begin_addr 调用,EP 的 ROI 完成后将有一个 m5_work_end_addr 调用。
您可以在 gem5 资源网站 上找到工作负载的详细信息,并在 gem5 资源 GitHub 上找到源代码。例如,对于 EP,这是带有 m5 地址版本注释的源文件。
02-kvm-time
所有材料都可以在 materials/02-Using-gem5/08-accelerating-simulation/02-kvm-time 中找到。
我们将编辑 02-kvm-time.py
目标
- 使用 KVM 快进模拟直到 ROI 开始。
- 当模拟到达 ROI 开始时,将 CPU 从 KVM CPU 切换到 TIMING CPU。
- 转储统计信息,以便我们稍后查看。
- 在收集有意义的统计信息之前重置统计信息。
- 安排一个退出事件,以便模拟可以提前停止,让我们查看详细统计信息。
- 开始详细模拟。
- 在详细模拟结束后查看统计信息。
02-kvm-time
首先,我们需要设置一个可切换的处理器,允许我们从 KVM CPU 开始,然后切换到详细的时序 CPU。
# Here we set up the processor. The SimpleSwitchableProcessor allows for
# switching between different CPU types during simulation, such as KVM to Timing
processor = SimpleSwitchableProcessor(
    starting_core_type=CPUTypes.KVM,
    switch_core_type=CPUTypes.TIMING,
    isa=ISA.X86,
    num_cores=2,
)
#
02-kvm-time
然后,我们需要设置 workbegin 处理程序以
- 在 KVM 快进结束时转储统计信息
- 从 KVM CPU 切换到 TIMING CPU
- 重置统计信息
- 在运行 1,000,000,000 个 Ticks 后安排退出事件
- 回退到模拟
# Set up workbegin handler to reset stats and switch to TIMING CPU
def workbegin_handler():
    print("Done booting Linux")

    print("Dump the current stats")
    m5.stats.dump()

    print("Switching from KVM to TIMING CPU")
    processor.switch()

    simulator.set_max_ticks(1000_000_000)

    print("Resetting stats at the start of ROI!")
    m5.stats.reset()

    yield False
#
02-kvm-time
现在,让我们注册退出事件处理程序。
simulator = Simulator(
    board=board,
# Set up the exit event handlers
    on_exit_event= {
        ExitEvent.WORKBEGIN: workbegin_handler(),
    }
#
)
02-kvm-time
如果我们运行它
cd materials/02-Using-gem5/08-accelerating-simulation/02-kvm-time
gem5 -re 02-kvm-time.py
我们将在终端中看到以下错误
Aborted (core dumped)
如果我们打开 simerr.txt,我们将看到以下错误
src/sim/simulate.cc:199: info: Entering event queue @ 0.  Starting simulation...
src/cpu/kvm/perfevent.cc:191: panic: PerfKvmCounter::attach failed (2)
Memory Usage: 3539020 KBytes
src/cpu/kvm/perfevent.ccProgram aborted at tick 0
:191: panic: PerfKvmCounter::attach failed (2)
Memory Usage: 3539020 KBytes
02-kvm-time
由于权限问题,某些内核会发生这种情况。 当这种情况发生时,我们可以通过禁用 KVM CPU 中 perf 的使用来避免错误。
# Here we tell the KVM CPU (the starting CPU) not to use perf.
for proc in processor.start:
    proc.core.usePerf = False
#
现在,让我们再次运行它
gem5 -re 02-kvm-time.py
02-kvm-time
启动内核并快进到 ROI 开始可能需要一分钟。
我们可以在 m5out 目录下的 board.pc.com_1.device 文件中查看终端中发生的情况。
以下日志
 NAS Parallel Benchmarks (NPB3.3-OMP) - EP Benchmark

 Number of random numbers generated:       536870912
 Number of available threads:                      2

 -------------------- ROI BEGIN --------------------
表明我们已到达 ROI 的开始。
02-kvm-time
如果我们查看 simout.txt,我们将看到模拟运行了我们的 workbegin_handler 并将 CPU 从 KVM CPU 切换到 TIMING CPU。
info: Using default config
Running the simulation
Using KVM cpu
Global frequency set at 1000000000000 ticks per second
      0: board.pc.south_bridge.cmos.rtc: Real-time clock set to Sun Jan  1 00:00:00 2012
Done booting Linux
Dump the current stats
Switching from KVM to TIMING CPU
switching cpus
Resetting stats at the start of ROI!
02-kvm-time
因为我们安排了一个退出事件,该事件将在运行 1,000,000,000 个 Ticks 后触发,模拟将在调用 work_begin_addr 之前退出,这样我们可以更快地查看统计信息以用于教程。
现在让我们查看统计信息。
它应该在 m5out 文件夹下的 stats.txt 文件中。
有两个统计信息转储,一个来自 KVM 快进的结束,另一个来自在任何线程中模拟 100,000 条指令后详细模拟的结束。
---------- Begin Simulation Statistics ----------
和
---------- End Simulation Statistics ----------
表示不同的统计信息转储。
02-kvm-time
让我们查看第一个统计信息转储。
由于我们使用 2 个核心,我们可以使用关键字 start0.core 和 start1.core 找到 KVM CPU 的统计信息。
如果我们在统计文件中搜索 board.processor.start0.core.commitStats0.numOps 和 board.processor.start1.core.commitStats0.numOps,
我们应该得到以下结果
board.processor.start0.core.commitStats0.numOps            0
board.processor.start1.core.commitStats0.numOps            0
这表明 KVM CPU 没有模拟任何操作,因此应该忽略 KVM CPU 产生的任何统计信息。这包括 simSeconds 和 simTicks。
重要的是,它还表明 KVM 快进不会预热微架构组件(例如缓存),因此我们应该考虑在测量实际详细模拟之前进行一段预热模拟。
02-kvm-time
让我们查看第二个统计信息转储。
我们可以使用关键字 switch0.core 和 switch1.core 找到 TIMING CPU 的统计信息。
例如,如果我们搜索 board.processor.switch0.core.commitStats0.numInsts 和 board.processor.switch1.core.commitStats0.numInsts,我们将找到 TIMING CPU 的总提交指令数
board.processor.switch0.core.commitStats0.numInsts      1621739
board.processor.switch1.core.commitStats0.numInsts      1091463
现在 simSeconds 和 simTicks 也很有意义,正如我们预期的那样,它应该是 0.001 和 1,000,000,000,因为我们安排的退出事件将在 1,000,000,000 个 Ticks 后退出。
simSeconds                                   0.001000
simTicks                                   1000000000
使用 KVM 快进的缺点
- KVM 快进需要实际的硬件 KVM 线程,因此它可能会限制我们可以并行运行的模拟数量。
- 每次运行我们都需要花费时间进行快进。如果快进区域很大,它仍然可能很耗时。
- 模拟系统必须与主机具有相同的 ISA。
- 它不是确定性的。
我们可以通过使用 gem5 中的检查点功能来解决上述缺点。
Checkpoint in gem5
gem5 中的检查点
- 保存系统的架构状态
- 保存一些微架构状态
- 在有一些限制的情况下,使用一种系统配置创建的检查点可以使用不同的系统配置恢复
- 核心数量必须相同
- 内存大小必须相同
- 工作负载及其依赖项(即磁盘镜像)必须相同
Hands-on Time!
03-checkpoint-and-restore
让我们创建一个检查点
我们将使用 KVM 快进到 EP 的 ROI,就像我们在上一个示例中所做的那样。 但是,这次我们有一个不同的目标。此外,我们将拥有一个比之前使用的系统简单得多的系统。
目标
- 使用 KVM 快进模拟直到 ROI 开始
- 到达 ROI 开始时,创建一个检查点
- 退出模拟
03-checkpoint-and-restore
所有材料都可以在 materials/02-Using-gem5/08-accelerating-simulation/03-checkpoint-and-restore 下找到。
我们将首先编辑 03-take-a-checkpoint.py 以创建检查点。我们将其称为检查点脚本。
在检查点脚本中,让我们首先为系统提供最简单的缓存层次结构,即根本没有缓存。
# Let's setup a NoCache cache hierarchy
from gem5.components.cachehierarchies.classic.no_cache import NoCache
cache_hierarchy = NoCache()
#
03-checkpoint-and-restore
接下来,让我们设置一个简单的单通道内存,大小为 3GB。
# Let's set up a SingleChannelDDR4_2400 memory with 3GB size
from gem5.components.memory.single_channel import SingleChannelDDR4_2400
memory = SingleChannelDDR4_2400(size="3GB")
#
对于处理器,由于我们不会切换到另一种 CPU 类型,我们可以使用带有 KVM CPU 的简单处理器。
# Here we set up a simple processor with the KVM CPU
processor = SimpleProcessor(
    cpu_type=CPUTypes.KVM,
    isa=ISA.X86,
    num_cores=2,
)
#
03-checkpoint-and-restore
对于 workbegin 处理程序,我们希望它创建一个检查点,然后退出模拟。
# Set up workbegin handler to reset stats and switch to TIMING CPU
def workbegin_handler():
    print("Done booting Linux")

    print("Take a checkpoint")
    simulator.save_checkpoint("03-cpt")

    yield True
#
在此示例中,它将把 gem5 检查点保存到目录 ./03-cpt 中。您可以使用 simulator.save_checkpoint() 函数配置路径和名称。
03-checkpoint-and-restore
让我们运行此脚本
gem5 -re --outdir=checkpointing-m5-out 03-take-a-checkpoint.py
模拟完成后,我们应该在 simout.txt 中看到以下内容
info: Using default config
Running the simulation
Using KVM cpu
Global frequency set at 1000000000000 ticks per second
      0: board.pc.south_bridge.cmos.rtc: Real-time clock set to Sun Jan  1 00:00:00 2012
Done booting Linux
Take a checkpoint
Writing checkpoint
Simulation Done
03-checkpoint-and-restore
我们还应该找到保存在 materials/02-Using-gem5/08-accelerating-simulation/03-checkpoint-and-restore/03-cpt 的检查点。
如果您感兴趣,可以查看 03-cpt 目录内的 m5.cpt 以查看正在保存的内容。
如果检查点是使用旧版本的 gem5 创建的,并使用新版本的 gem5 恢复,gem5 检查点可能会过时。
在这种情况下,我们可能需要使用新版本 gem5 的 gem5/util/cpt_upgrader.py 来更新它。
03-checkpoint-and-restore
让我们恢复检查点!
我们将使用与 02-kvm-time 中完全相同的系统来恢复我们刚刚创建的检查点。
我们可以将检查点的路径作为参数传递给 simulator 对象。
我们也可以使用 board 对象传递路径。更多详细信息可以在这里找到。
对于此示例,我们将路径传递给 simulator 对象。
simulator = Simulator(
    board=board,
# Pass in the checkpoint path
    checkpoint_path="/workspaces/2024/materials/02-Using-gem5/08-accelerating-simulation/03-checkpoint-and-restore/03-cpt"
#
)
03-checkpoint-and-restore
simulator.run(1_000_000_000)
注意:我们在恢复脚本中将模拟设置为在 1,000,000,000 个 Ticks 后退出,但在实际场景中,我们可能希望在 ROI 结束时停止。
为此,我们需要使用不带参数的 simulator.run() 和一个 workend 退出事件处理程序。可以在 gem5/configs/example/gem5_library/x86-npb-benchmarks.py 找到一个示例。
除了 simulator 和 processor 是不可切换的 SimpleProcessor 之外,其他所有内容都与我们在 02-kvm-time.py 中使用的脚本相同。
我们可以运行此恢复脚本
gem5 -re --outdir=restore-m5-out 03-restore-the-checkpoint.py
03-checkpoint-and-restore
模拟完成后,我们应该在 simerr.txt 中看到
src/sim/simulate.cc:199: info: Entering event queue @ 14788319800411.  Starting simulation...
src/dev/x86/pc.cc:117: warn: Don't know what interrupt to clear for console.
build/ALL/arch/x86/generated/exec-ns.cc.inc:27: warn: instruction 'verw_Mw_or_Rv' unimplemented
与从头开始的模拟不同,恢复检查点的模拟将从创建检查点时的 Tick 开始。
如果我们在检查点文件夹下的 m5.cpt 文件中搜索 curTick,我们将看到创建检查点时的 Tick。它可能与这里显示的示例不完全相同,因为 KVM 会给 Ticks 带来变化,但恢复模拟中的起始 Tick 应该与 m5.cpt 文件中的 curTick 匹配。
curTick=14788319800411
03-checkpoint-and-restore
正如开头提到的,在检查点和恢复系统之间可以更改的内容有一些限制。
- 两个系统中的核心数量必须相同(如果它们不相同,恢复模拟不会出错,但不能保证正确性)。
- 两个系统中的内存大小必须相同。
- 工作负载及其依赖项(即磁盘镜像)必须相同。
对于此示例,我们的缓存层次结构、内存类型和 CPU 类型在检查点和恢复系统之间是不同的。
03-checkpoint-and-restore
# restoring script
cache_hierarchy = PrivateL1CacheHierarchy(
    l1d_size="32kB",
    l1i_size="32kB"
)
memory = DualChannelDDR4_2400(size="3GB")
processor = SimpleProcessor(
    cpu_type=CPUTypes.TIMING,
    isa=ISA.X86,
    num_cores=2,
)
###
# checkpointing script
cache_hierarchy = NoCache()
memory = SingleChannelDDR4_2400(size="3GB")
processor = SimpleProcessor(
    cpu_type=CPUTypes.KVM,
    isa=ISA.X86,
    num_cores=2,
)
03-checkpoint-and-restore
这些更改都在限制范围内,但如果我们将内存大小从 3GB 更改为 2GB,我们将看到以下错误。
src/mem/physical.cc:462: fatal: Memory range size has changed! Saw 3221225472, expected 2147483648
Memory Usage: 2507496 KBytes
补充说明
有了这个检查点,我们不再要求主机具有与模拟系统匹配的 ISA 来到达 EP 的 ROI 开始。
重要补充说明
在使用具有 Ruby 缓存的系统创建检查点时,我们只能使用 MOESI hammer 协议。
总结
KVM
优点:
- 以接近主机的本机速度快进
- 对模拟系统更改灵活
- 对工作负载和软件更改灵活
缺点:
- 非确定性
- 主机必须匹配客户机的 ISA
- 不支持 RISC-V
检查点
优点:
- 创建一次,运行多次
- 支持几乎所有设备/组件
缺点:
- 在检查点和恢复之间完全不能更改工作负载和软件
- 在检查点和恢复脚本之间的模拟系统更改有限制
- 需要磁盘空间
如果 ROI 很大怎么办
我们现在知道如何跳过模拟的”不重要”部分,但如果模拟的重要部分太大怎么办?
如果我们不是面对这种情况

而是实际上面对这种情况
